
Barry's lithium powerbox
This is a project to build a battery box that is charged from either a
solar photovoltaic panel or via the vehicle alternator. I refer to it
as a "powerbox". There are many ready-made powerboxes, from highly
portable intended for occasional camping trips, that charge from the
vehicle's cigarette-lighter socket (as well as solar), to the more
permanent-but-still-removable "hard-core" type, that are wired to the
vehicle battery.
There are a lot of ready-made powerboxes to choose from on the
Australian market. I wrote this short survey, that lists some of these,
especially of the hard-core variety:
https://bkhome.org/news/202004/ready-made-lithium-powerboxes.html

Those who want to take the hard-core route, have a choice, either
build it in permanently, or as a removable box. The former will be DIY,
the latter will be a choice -- ready-made or DIY. If you decide to take
the latter path, removable and DIY, I have been this way, and have
documented my project. The links that follow are the steps taken in my
project...
Barry's lithium powerbox
I will preface by stating that these instructions are how I did it,
but are really only intended as a source of ideas for your own design. A
"jumping off" point, so to speak, from which you can craft your own
creation.
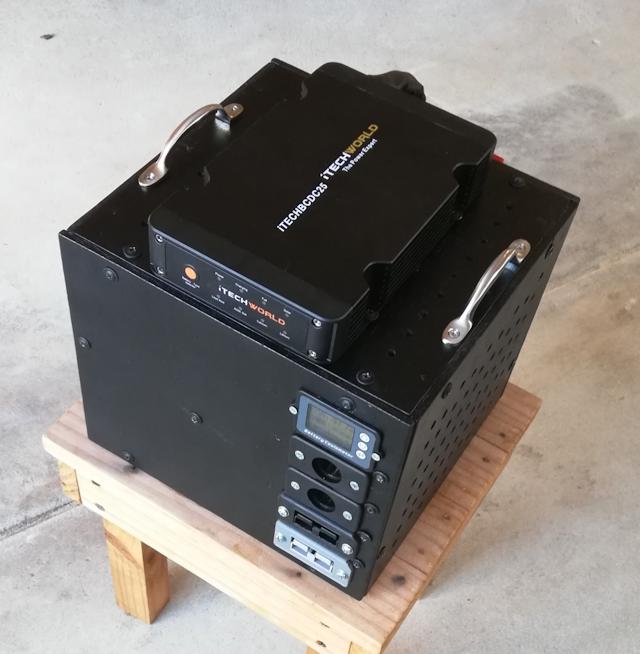
Here is the finished product. It measures 250mm wide, 270mm deep and 253mm high, weight just on 11kg. Front view:
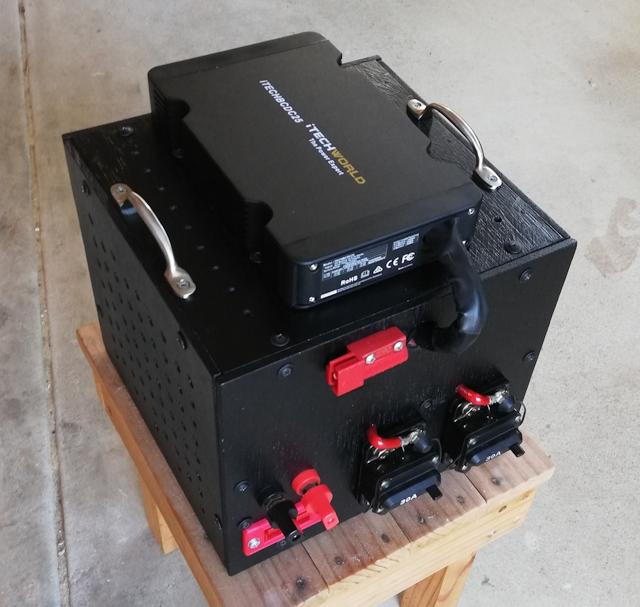
And this is the rear view:
To understand what all of those plugs and sockets are, here is a quasi-physical-layout circuit diagram:
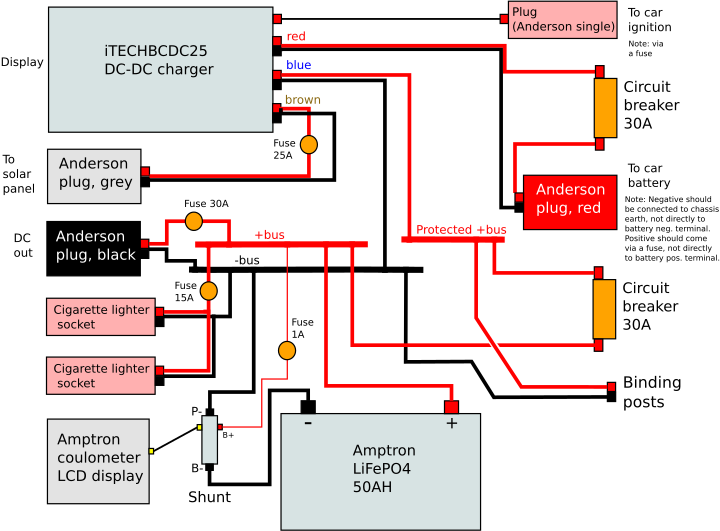
...on the left are the sockets and displays on the front panel, and the right is the back panel.
If this kind of DIY project interests you, I suggest read through all
of my posts linked below, then think how you would like to do it for
your vehicle. It is likely that you will want to have a different box
design, to suit available space in the vehicle -- maybe behind the
passenger seat -- or you may prefer a more conventional layout, with the
wiring all in the lid of the box. Whatever, be creative, and let me
know if you build your own powerbox!
1. The first post explains why the choice of a 12v lithium battery, instead of a deep-cycle AGM battery:
https://bkhome.org/news/202004/portable-lithium-power-for-camping.html
2. General discussion of cable sizes, applicable to all aspects of off-the-grid:
https://bkhome.org/news/202004/cable-sizes-for-battery-camping-system.html
3. Improvements to the circuit diagram:
https://bkhome.org/news/202004/powerbox-fuse-redesign.html
4. Start of the physical construction of the box:
https://bkhome.org/news/202004/base-of-lithium-powerbox.html
5. This is an addendum to the earlier post on cable sizes:
https://bkhome.org/news/202004/confusing-online-voltage-drop-calculators.html
6. Continuing construction of the box:
https://bkhome.org/news/202004/top-plate-of-lithium-powerbox.html
7. It would be great if someone can
figure out a simple way for the battery clamp to screw-down from the
top, so as not to have to open the front and back panels:
https://bkhome.org/news/202004/powerbox-side-panels-and-battery-clamp.html
8. Panel cut-out diagrams, suggest reverse these if you drive on the right side of the road:
https://bkhome.org/news/202004/powerbox-external-assembled.html
9. Wiring of the "wiring-board" and to the external connectors:
https://bkhome.org/news/202004/wiring-of-powerbox-underway.html
10. Dealing with current limitations in blade fuse holders:
https://bkhome.org/news/202004/holders-for-blade-fuses-in-powerbox.html
11. Very useful notes on soldering:
https://bkhome.org/news/202004/cable-and-soldering-guidelines.html
12. More useful notes on construction and bits & pieces needed:
https://bkhome.org/news/202004/battery-insertion-and-more-bits-and-pieces.html
13. Contemplating refinements to the design and layout:
https://bkhome.org/news/202004/reflections-on-construction-of-the-wiring-board.html
14. The powerbox assembled, take #1:
https://bkhome.org/news/202004/wiring-board-installed-in-powerbox.html
15. Essential feature, an LCD display of battery state-of-charge, voltage, current, etc.:
https://bkhome.org/news/202004/installation-of-the-coulometer-lcd-display.html
16. The powerbox assembled, take #2:
https://bkhome.org/news/202004/dc-dc-charger-issues-and-powerbox-improvements.html
17. Problem with iTECHBCDC25 DC-DC charger resolved, but tracks off the peak-power point:
https://bkhome.org/news/202005/itechbcdc25-dc-dc-charger-problem-resolved.html
18. Photo-shoot of the final product;
https://bkhome.org/news/202005/lithium-powerbox-photo-shoot.html
The jury is still out for the maximum power point tracking of the
iTECHBCDC25. It is several watts off the peak point, but I need to do
some more tests. If in doubt, and don't mind the price, consider buying
the "gold standard" in DC-DC chargers: the Redarc range -- like the
iTECHBCDC25, it is sealed and passively cooled,
Tags: nomad