
TreeHugger 1P tarp weighs only 178g
Page first written June 5, 2021
Early this year (2021), I went for a hike with only a Mountainsmith Daylight Lumbar Pack. Blog post:
https://bkhome.org/news/202102/waist-pack-hiking-test-2021.html
I was carrying about 4.5kg, including weight of the lumbar pack,
which was a bit too much. Since then, I have been reconsidering my gear,
aiming to get the weight down to about 3.5kg.
As part of that exercise, I decided to make my own tent. Yes, I want
an extremely light weight tent, but also some comforts and conveniences, including
these:
- Step-in and step-out, to save my back.
- Double-wall, to minimize condensation.
- Very quick and simple to erect, minimum of stakes.
- Can be used outside or in a shelter.
- Extreme light weight, rollup very small.
- If possible, some kind of back-rest.
I own a sewing machine, but skill with using it is practically zero. So, add item-7, minimize or even eliminate sewing.
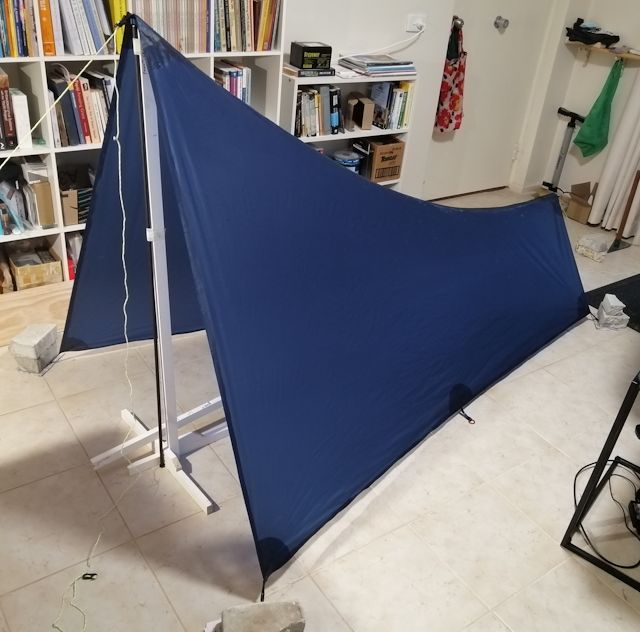
This web page is a tutorial, a how-to, but first I will tell you the end result:
| TreeHugger 1P tarp, Mark-1 Weighs only 178g (6.3oz), constructed mostly by glueing, minimal sewing. Featuring step-in and step-out, very easy to erect, use a pole or tie against a tree for "tree hugger" mode (or a wall in a shelter). In future, intention is to construct a mesh inner tent, so it will become a double-wall tent. |
Here it is:

The full implications of this tent will not become apparent until the
inner mesh tent is constructed. This will be permanently builtin, and
will support the step-in and step-out, as well as make the "tree hugger"
backrest usable in all weather. It will also be part of the structural
integrity of the tent when erected.
Now for the how-to, tutorial, or DIY steps. I do recommend that you
read right through before constructing one of these yourself, as they
are a series of blog posts, and some ideas evolved as the project
progressed.
1. Consideration of glueing instead of sewing
The proposed ultralight tent is to be made with 10D silnylon, very
thin, slippery, and stretchy. Sewing together two layers of that is a
challenge, even for experienced sewers. So, I investigated the
alternative, to glue:
- Glueing silnylon fabric versus sewing — May 08, 2021
Longitudinal strength good, but "peel strength" a problem. Note
though, not all silnylon is the same -- the chemical composition of the
silicone differs, and some have better "peel strength". The one I tested
does not, however, other silnylons are under order and will be tested.
Anyway, the silynlon that I already have will, I think, be OK, as
long as there is no weakness at a seam where a tear can start. For the
tarp, the main place of concern is the ridgeline.
2. Drawing of the original TH1P design
I used an application called "SolveSpace" to plan the "TreeHugger 1P" tent.
The tent is intended to be erected by tying each end to a branch, or
on poles. There will be a high-end and a low-end, so essentially the
tent is like others out there that erect on a single trekking pole.
This type of tent has a problem with very little head-room when
sitting up inside, or rather, trying to sit up, especially if there is
also an inner mesh tent. The main problem is that trekking poles are
only so long, typically 125cm. So, the original workaround was to use a
"spreader bar" just above the head.
The concept has a vertical wall at the head-end, so that if tied to a
tree in "tree hugger" mode (or a wall), there is a comfy backrest while
in the tent.
The side-entry allows easy step-in and step-out, great for my back, no crawling in and out!
Here are the drawings, but do bear in mind that these are only incomplete approximations to the concepts in my head:
- TH1P tent design using SolveSpace — May 13, 2021
3. Simplified tarp, mark-1 design
As I am an absolute beginner to tent construction, fabrics and
sewing, I decided to simplify the tarp, that is, the outer wall of the
tent (also known as the "fly"). I did away with the head-spacer bar --
that was going to be a 25cm carbon fibre tube.
Now we are onto actual construction. The tarp is two pieces, to be
sewn together along the ridgeline. This blog post describes cutting out
the pieces:
- TH1P mark-1 simple tarp — May 18, 2021
The above instructions are for a "straight cut" ridgeline. However, if you
would prefer a "catenary cut" ridgeline, here is the Mark-1 tarp with a deep-cut catenary curve:
- TreeHugger 1P Mark-1 tarp deep catenary cut — July 04, 2021
I like the deep-cut catenary, and it is my choice. The sides are
taut, less flopping in the wind, and the wind flows more easily over the
tarp rather than trying to push it over. Downside is less head-room.
However, it is your choice,
you might prefer the straight-cut if the tarp is to be erected in other
configurations.
4. Glueing hems and ridgeline
I found this to be fairly easy, but then, "easy" is relative and I
cannot guarantee that others will find it easy. I was also surprised how
little silicone adhesive I used -- I was originally worried that it
might increase the weight of the tent too much. Blog post:
- Tarp glueing hems and ridgeline — May 21, 2021
One thing to be careful about, is that the hems must be folded so they are on the inside -- for both sides of the tarp.
If you choose the deep-cut catenary, read the link given at Step-3, which has notes on glueing the ridgeline.
5. Reinforcing for the tie-outs
There are webbing loops at all the tie-out points, and these require
reinforcing of the fabric, to spread the forces. I glued these on also:
- Tarp glueing reinforcing — May 23, 2021
Again, these are all glued on the inside, that is, the underneath, of the tarp.
6. Folding carbon fibre pole for low-end
Ultimately, I intend that the carbon-fibre pole at the low-end will be sewn into the tent. For now, it is a separate pole.
An important requirement is that it be no longer than 25cm, as I want
to be able to lay it flat inside the lumbar pack, or backpack.
Originally, that was it, a single 25cm pole, however, I very quickly
realised could not get enough foot-room. Needed extra height, so
constructed a two-part pole, each segment 25cm:
- Constructing short pole for tarp — May 27, 2021
7. Tie-outs for the ridgeline
This step involved some experimenting. I wanted a light-weight way to
hold the pole tips in place. I mostly intend to tie the high-end of the
tarp to a branch or tree trunk, however, a pole is an alternative. So
the high-end required some kind of "socket" to accept the pole, and it
must have sufficient strength and spread the forces. This is what I came
up with;
- Tarp ridgeline tie-outs — May 30, 2021
Also, read the deep-cut catenary link at Step-3, which shows a refined "socket" for the carbon-fibre poles.
8. Tieouts for the bottom
These are the tie-outs for the four corners, and the middle on the side hems:
- Bottom tie-outs and tarp completed — June 05, 2021
And the tarp is ready to use!
Can be used, yes, but for me, this is only stage-1. Next, plan to add
"end panels", and will append to this tutorial when that is
done.
9. Tarp is now a tent
Step-9 is an update to this project, I have added the "end panels"
and now have a tent, that intend to take on the next hike. Blog report:
- End panels for TreeHugger 1P Mark-1 tarp — July 11, 2021
The tent, without poles, weighs 242g (8.64oz). It rolls up very small:
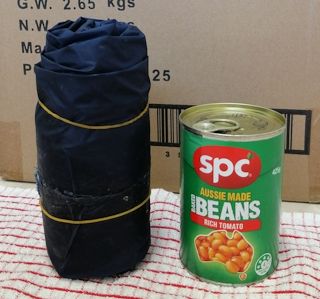
...just 175mm long and 80mm diameter. And here it is on its first outing:
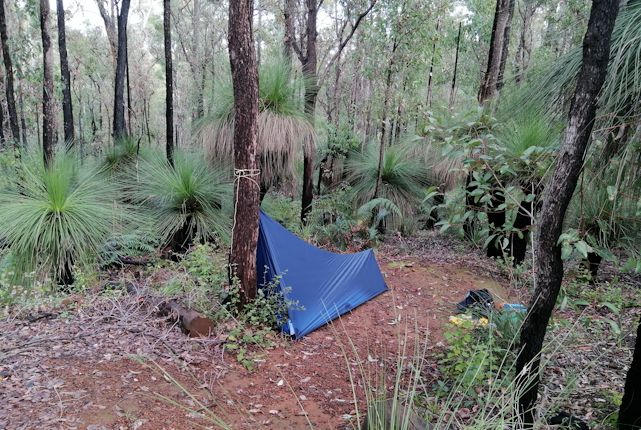
...erected in "tree hugger" mode. Lovely bushland in South West of Western Australia.
Postamble
If you would like to discuss any aspects of this tarp with other
MYOGers (Make Your Own Gear -ers), I started this thread on the
Australian Bushwalking Forum:
https://bushwalk.com/forum/viewtopic.php?f=53&t=35426
I have a couple of different silnylon ripstop fabrics on order, and
intend to compare their "peel strength", with a view to finding the best
ones for constructing a glued tent. Tim (forum member 'telemarketim')
would like to do this in an organized way, I presume that he would like
to come up with some actual strength figures. His request for fabric
samples is here:
https://bushwalk.com/forum/viewtopic.php?f=53&t=35134
Note, the silnylon that I have used is ripstop nylon, silicone coated
both sides, in fact is permeated with silicone. I am not interested in
ripstop fabrics that have polyester one side and silicone the other. Nor
am I interested in polyester ripstop, as it is not as strong as nylon.
Tim, however, would also like to test sil-poly (polyester ripstop with
silicone coating).
Regards,
Barry Kauler
This page (c) Copyright Barry Kauler 2021, all rights reserved.
Tags: light